Enhances interactive test dialog
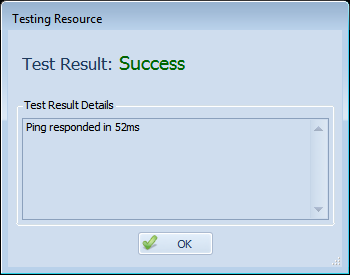
Overseer 5.0 has a new test dialog. This test dialog is a little more visually appealing, but also makes it easier to copy any error messages out for pasting into other programs, such as Emails. In the future, this dialog will hopefully be used to display more detailed error messages and links to blog posts that may be helpful in diagnosing the issue.
Memory usage or process counts are always logged in the ‘data’ field for process monitor checks, regardless of failure/success
Most resource types in Overseer log some sort of data to the ‘data’ field, accessible by looking at the resource history. This can be useful for temperatures, response times, etc. With Overseer 5.0, the Process monitor was changed to properly log the memory usage or process counts to the data field with each check. This makes monitoring windows processes with Overseer a little more useful, even if you don’t have any failures.
Adds toolbar below menu for easy access to frequently used functions
Overseer has always been a simple-to-use network monitoring tool, and as such, I’ve kept the interface rather simple. I personally didn’t see users accessing items in the drop-down menus often enough to justify a toolbar. However, some users definitely do access functions up there, and generally it’s just a lot faster when a user actually does.
So, with Overseer 5.0, I’ve added a toolbar:
This toolbar offers a few icons:
- New Resource – this option lets you add a new resource to Overseer. Clicking it will show a drop-down of all the different resource types.
- Resource Groups – clicking this option will allow you to edit/add/delete your resource groups
- Notifications – clicking this option will allow you to edit/add/delete your notifications
- Notification Groups – clicking this icon will allow you to edit/add/delete your notification groups
- Passwords – Clicking this icon on the toolbar will let you add/edit/delete your passwords/credentials
- Schedules – If you select this icon, you’ll be able to add/edit/delete your schedules.
- Options – This option presents an easy way to access the Tools->Options section.
- Service Running – This displays the current status of the Overseer service. Clicking it when it says ‘Service Running’ will stop the service. Clicking it when it says ‘Service Not Running’ will start the service
- Help – This will launch the help file.
Adds the ability to see the status of the Overseer service and start/stop it from toolbar
Overseer Network Monitor depends on a Windows service to run. This Overseer windows service is what monitors your resources, sends notifications, etc. It’s critical that this service is running, so the start type is set to automatic. Up until now, however, the Overseer management application hasn’t displayed the current status of the service. Sure, when starting the management application it will prompt to start it if it’s not running, but if the service stops running otherwise, it’s of no help.
In Overseer 5.x, I added a user interface element that I’ve been meaning to for a while– a service status indicator. This service indicator is in the upper right corner on the toolbar, and shows the current status.
This is what it looks like when the service is running:
This is what it looks like when the service is not running:
Additionally, if you click the button, it will start/stop the service, based on which state you’re in. If the service is running, it will stop the service(not generally something you want to do, FYI). If it is not running and you click it, it will start the service.
This should give a nice visual clue as to what’s going on with your network monitoring software.
Adds splash screen when starting
Previous version of Overseer would occasionally take a little while to start, for one reason or another. This was sometimes a bit confusing to users. In Overseer 5.x, I added a simple splash screen:

This splash screen isn’t the prettiest out there, but it is functional, and provides information regarding what is going on when starting the Overseer network monitoring software.
Adds ‘Data’ section to options, allowing user to change location of Overseer database
Previous versions of Overseer all stored their data in a ‘Data’ subdirectory of the installation directory– typically C:\Program Files\Overseer\Data\. Microsoft frowns upon putting data in an application’s binary directory(or subdirectory), however– so in Overseer 5.x, the database has moved to the ‘proper’ place, according to Microsoft. Overseer’s data is accessed by ‘all users’, so on Windows XP and 2003, this is in C:\Documents and Settings\All Users\Application Data\Overseer\. On Windows Vista+, this has moved to the far simpler C:\ProgramData\Overseer\.
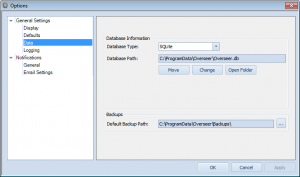
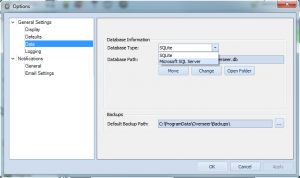
These directories aren’t always easy to navigate to, so I’ve added a simple interface in Tools>Options->General Settings->Data:
As you can see, this indicates the database type, database path, and provides a few buttons to manage this. The ‘Move’ button lets you change the directory your data is stored(this moves your database as well)– this is useful if you want to put the Overseer database on a network drive, for example. The “Change” button lets you point Overseer to a different location, where you already have an Overseer 5.x database. And lastly, “Open Folder” opens the data folder in Windows Explorer.
Adds the ability to run discovery for just one host
Overseer’s auto-discovery wizard is a very quick way to get up and running monitoring your network servers in no time. Previously to 5.0, the only way to use it, was to discover hosts from active directory, however. With Overseer 5.0, I’ve added the ability to enter a list of servers/host manually. This can be just one, or many. This is a great way to add monitoring for just one new server.
Overseer backup and restore wizard
Previous version of Overseer did not have a built-in system for both database backup and restoration. Later versions of Overseer 4.x had a backup wizard, but nothing to restore the database afterward. Overseer 5.x adds a robust new backup and restoration system, called the Backup and Restore Wizard.
This wizard makes backing up your database a snap. Simply start the wizard(Tools->Backup and Restore Wizard), select where to place your backup(defaulting to a sub-folder of the Overseer data directory), click next, and the backup is performed. The backup files are automatically named with the date and time, making it easier to see when the backup was done.
Backup files made by the wizard are simple files that can easily be copied or Emailed. They’re in SQLite database format, regardless even if you’re using a MSSQL server for your Overseer database.
Once you have a backup file, you can easily restore that backup by starting the Backup and Restore wizard again, and this time selecting ‘Restore’ and pointing to the file you’re interested in restoring. Note that restoring will overwrite any data you currently have in Overseer– so be careful when restoring backups.
Adds support for extended event logs in W2K8(“Applications and Services Logs”)
One of the big new features in Overseer 5.x, and the core reason for updating to .NET Framework 3.5, is support for Windows 2008 R2’s new extended event logs, termed the “Application and Services Logs”. Reading these event logs required a new API which was only available in .NET Framework 3.5.
Overseer 5.x now supports all of these event logs and the standard event logs. Unfortunately, the API requires Windows Vista, Windows 7, or Windows 2008+ to be running on the Overseer computer as well– so if your Overseer computer is running on Windows XP or Windows 2003, and you want to monitor extended event logs, you’ll have to upgrade the computer running Overseer. Unfortunately, this is a limitation of the API.
With this new feature, along with Overseer’s existing event log filtering, duplicate event detection, and more, Overseer’s event log monitoring software features should satisfy most user’s needs.
Enhances the schedule exceptions interface
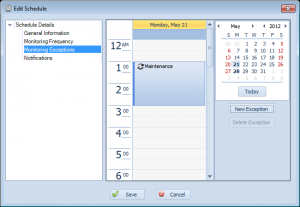
Overseer has supported schedule exceptions for maintenance periods for quite some time. The interface to add the exception was a little clunky, and somewhat hidden. In Overseer 5.0, this interface has been moved to a page in the ‘Edit Schedule’ screen:
Exceptions are clearly shown on a calendar, with the ability to easily create a new exception, delete an old one, or double click to edit a current one.
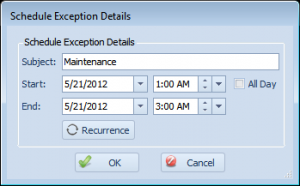
Once you edit an exception, you’re presented with this screen:
This screen lets you specify a subject/name for the exception(this is for your reference), the start/end date and times for the exception, along with a button to set a recurrence. Recurring exceptions are useful if you have maintenance occurring at the same time on a schedule(i.e. a weekly server reboot).
Monitoring exceptions are a key feature to have in your network monitoring software, and Overseer fully supports this feature.
Using MSSQL for Overseer’s database
One of the new features in Overseer 5.x, is support for using Microsoft SQL for Overseer’s database. Overseer already supported, and continues to support database monitoring, but this feature is different. Normally, Overseer uses a SQLite file-based database, stored on the local file system. This works quite well, but some people with very large data needs, or those that want easier access to the data for reporting purposes, would prefer to use MSSQL. You can use Microsoft SQL Express, Standard, Data Center, MSDE, etc.– any version of MSSQL except Microsoft SQL CE should work.
Overseer 5.x includes an optional MSSQL add-on module that allows Overseer to use MSSQL as the Overseer database. If you’ve purchased the module and would like to configure MSSQL, this blog post will show you how. If you need to purchase the module, it’s available on this page:
http://www.overseer-network-monitor.com/UpgradePricing.aspx
Creating the database:
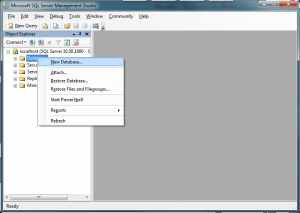
First, create a database in MSSQL. This can be done in Microsoft SQL Server Management Studio by right clicking on ‘Databases’ and selecting ‘New Database’:
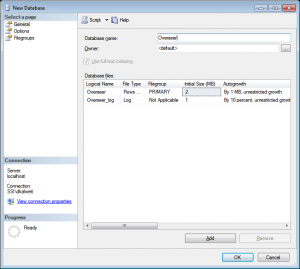
Name the database whatever you want. I am using ‘Overseer’ in the example below:
Database Login
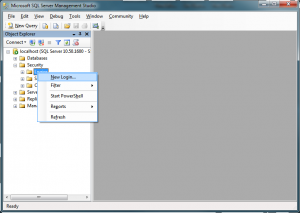
Next, you must create a database login. You can do so in MSSQL Management Studio by going to Security->Logins, right clicking, and choosing ‘New Login’:
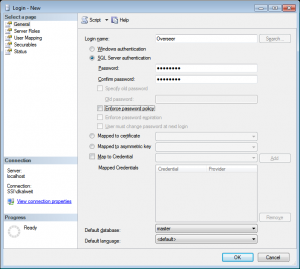
Create a login such as the one below, named ‘Overseer’. I’ve used SQL authentication, but you can use Windows authentication if you’d rather. I do not cover the steps involved in setting up Windows authentication in this blog post.
Creating the database user
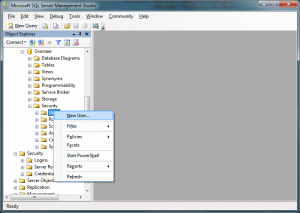
Now that we’ve created the database and the server login, we must create the database user. To do this, expand the database, down to Security->Users, and right click and select ‘New User’:
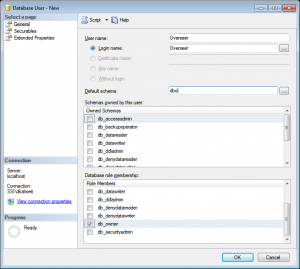
Create the user with the name ‘Overseer’, select the login we created below, set the ‘Default schema’ to dbo, and check “db_owner’ in the ‘Database role membership’ section only:
Overseer Configuration
Now that we have the database created, the MSSQL login created, and the database user created with the appropriate permissions, it’s time to point Overseer to this database. If you plan to upgrade your existing Overseer database, please back it up using the Backup and Restore wizard first. We’ll be restoring it after.
First, go to Tools->Options, and then choose General Settings->Data. Select ‘Microsoft SQL Server’ from the ‘Database Type’ dropdown:
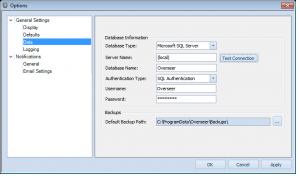
Once Microsoft SQL Server is selected, you’ll be presented with different options. Please enter in the appropriate values– you can use (local) for the MSSQL server if it is installed on the same computer as Overseer– otherwise, enter the server name. For the database name, enter the database we created above. The user is the login name we created above, and the password is the password you used for the MSSQL login:
Click ‘Test Connection’ to make sure things are setup, and then click OK.
At this point, Overseer should be using the new MSSQL database. If you backed up your old database, you can restore it now using the Backup and Restore wizard. Otherwise, you should have a clean, empty database that you can start filling. It may be helpful to use the resource discovery wizard for this purpose.
Installing .NET Framework 3.5.1 on Windows 2008 R2
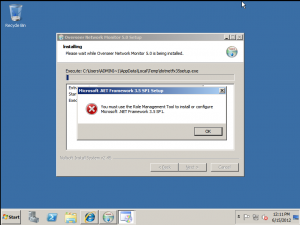
Windows 2008 R2, sadly, forces users/administrators to install the .NET Framework using the built-in role/feature-management system. This means that if you try to install Overseer 5.0 on a Windows 2008 R2 system without the framework already installed, you’ll get this error when the installer tries to install it:
So, the proper way to install .NET 3.5 on Windows 2008 R2 is using the ‘Role Management Tool’. This is a little mis-leading, as you can actually simply install .NET 3.5.1 as a ‘Feature’– there is no ‘.NET 3.5.1 role’ if you try to add a role. Sure, it gets added as part of the other roles, but why install more than you have to?
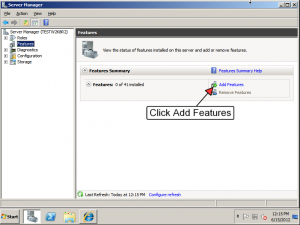
To install just 3.5.1 on Windows 2008 R2, open the server manager and select the ‘Features’ section on the left, and then click ‘Add Features’, such as in this screenshot:
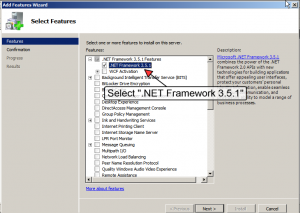
Once that’s done, you need to find “.NET Framework 3.5.1” in the list. This hides under the “.NET Framework 3.5.1 Features”. Note that you don’t need WCF Activation for Overseer. Simply select the .NET Framework 3.5.1 and continue through the wizard until completed:
Now that the .NET Framework 3.5 is installed, you can continue installing Overseer 5.0 so you can monitor your network resources.
Categories:
- How To (28)
- Known Issues (5)
- New Features (36)
- News about Overseer Network Monitor (3)
- Tips and Tricks (55)
- Using the Software (51)
- Windows Monitoring (9)
